Thanks for coming to my site. In case we haven’t met yet, I’m Kevin and I just love passing on my 30 + years of experience repairing and maintaining cars.
I’ve made this site for non-technical drivers who are experiencing problems with their cars.
Read More
Published date: February 18, 2022
Updated date: February 27, 2024
Reading time: 9 min
This article was fact checked
Share
Helpful: 100%
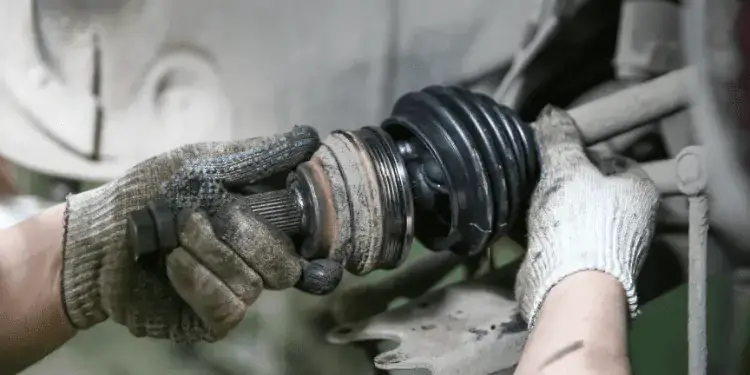
CV boots are a simple part that has an important job. CV boots are usually made of rubber but can sometimes be made from polyurethane or neoprene. The CV joint has bearings covered in grease.
The purpose of the CV boot is to keep the grease around the CV joint and keep water, dirt, and other contaminants out. If the CV boot becomes damaged, contaminants can get into the CV joint and cause the bearings to wear quickly, requiring the axle shaft to be replaced.
There are a couple of ways to replace the CV boot yourself without removing the axle from the car.
We will discuss both ways of doing this, the pros and cons of each, and the tools required.
Using A CV Boot Repair Kit
You can buy universal kits to replace a damaged CV boot easily. These kits will come with a replacement boot that is split down one side or in two pieces.
This allows you to easily fit the boot over the CV joint, then glue the seam or seams with the adhesive supplied in the kit.
The kit will also come with new clamps to secure each end of the new boot to the axle shaft. The benefit of using one of these kits is that it’s the easiest way to replace a damaged CV boot.
The job can be completed much faster, and only a few basic tools are required. The drawback to this option is that since the new boot comes with a slit down the side of it or in two pieces, if the adhesive fails, you will have a hole in the boot, which was the problem you were trying to fix.
Using one of these kits is usually more a temporary fix than a long-term repair. The kits are inexpensive, though, around $15-$30.
How To Install A Repair Kit
To install one of these kits, jack up the side of the car that needs to be repaired. Jack up the car on solid, level ground. Use jack stands to support the car safely.
Block the wheels on the other end of the car, so it doesn’t roll. Remove the wheel and tire. On most cars, you should have enough access to replace the boot. Remove the clamps securing the boot to the axle shaft, then cut the old boot off.
Once the old boot is out of the way, clean all the old grease from the CV joint. Now you can position the new boot around the CV joint. Use the supplied adhesive to glue the split seam on the boot and allow it to dry.
Once the adhesive is dry, pack new grease around the CV joint under the new boot. Then secure the boot to the axle shaft with the provided clamps.
Then, you can put the wheel back on and tighten the lug nuts to the recommended torque spec. Let the car down off the jack and jack stands, and you’re ready to drive again.
Installing An OE Style CV Boot
The next option is to use an OE-style replacement boot. These are made to fit your specific car, whereas the repair kits are universal. The benefit of using a replacement boot is that it fits much better and will last longer.
OE replacement boots are usually a little less expensive.
Depending on the car, expect to pay around $5-$20. The downside is that it will take longer to replace because more parts have to be removed.
How To Replace An OEM Style CV Boot
Some of the steps will be the same as before. Start by jacking up the car and supporting it on jack stands. Remove the wheel. If you’re replacing the outer CV boot, remove the axle nut. If replacing the inner boot, you will not have to remove the axle nut.
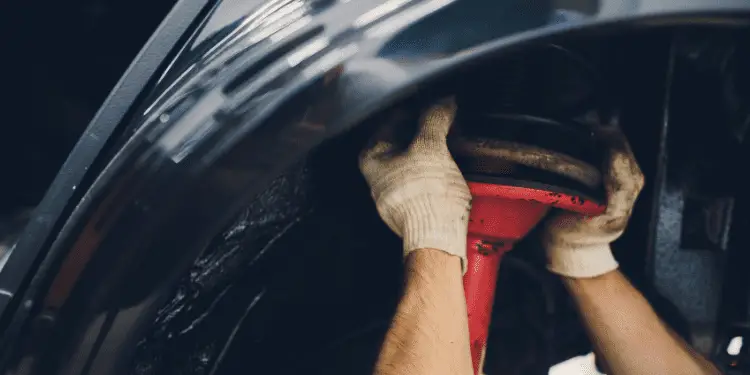
Next, unbolt the tie rod and separate the tie rod from the steering knuckle. Then remove the nut for either the upper or lower ball joint and separate the ball joint from the control arm.
At this point, you should be able to move the steering knuckle/ hub assembly away enough to get one end of the axle shaft out. Now you can cut the old boot off and the clamps holding it on.
Clean the old grease out of the CV joint. Depending on the car, you may be able to slide the new boot over the end of the axle shaft.
There are cone-shaped tools that help stretch the new boot over the joint, or you can use a funnel.
However, you won’t be able to stretch the boot enough to get it over the joint on some cars. In this case, you will need to remove the CV joint’s end from the axle shaft’s main part.
You will need to use a repair manual for the specific year, make, and model car you own for the exact procedure on how to do this.
Once you can get the new boot on, you can pack the joint with grease and secure the boot with new clamps. Then reassemble everything in the reverse order it came apart.
Tools You Will Need
To replace the CV boot on your car, you will need a
Jack
Jack Stand
Lug Wrench
Screwdriver
Pry bar
Hammer
Pliers
Knife.
And if you are replacing it with an OE-style boot, you will also need a
Ratchet
Sockets
Wrenches.
A repair manual covering your specific year, make, and model is also a good idea because it will have the complete procedure for your car and torque specifications.
Hence, you know how tight the bolts should be when you’re putting everything back together.
Things To Look For
If your car has a ripped CV boot, before you replace it, inspect the CV shaft. If the boot had been ripped for a while, most of the grease could have escaped, or contaminants could have gotten in.
This could cause the bearings in the CV shaft to wear out, requiring the entire CV shaft to be replaced. To check the CV shaft, listen for a clicking sound when driving, especially when turning.
You can also jack up the car and feel if the CV joint is loose. Either of these could signify that the CV shaft needs replacing.
When working on your car and using a jack and jack stand, exercise caution so that the car doesn’t fall; make sure the car is on solid, level ground and the wheels are blocked to keep from rolling.
Avoid being under the car if it falls as much as possible. After putting everything back together, double-check that all the bolts are tight and nothing was missed.
On the first drive after the repair, drive slow at first and listen for any rattles or noises that weren’t there before. After driving for a few miles, it’s a good idea to check the nuts and bolts again to make sure none of them loosened up.
If your CV boot gets damaged and you notice it immediately, replacing it with a new one can save a lot of money over replacing the entire axle shaft. It will usually be less work replacing just the boot as well.
Thanks for coming to my site. In case we haven’t met yet, I’m Kevin and I just love passing on my 30 + years of experience repairing and maintaining cars.
I’ve made this site for non-technical drivers who are experiencing problems with their cars.